
Your credit card is out and just as you were about to buy a design software that’s been on your radar, the unexpected happened.
Papers in your room flipped open, bolts of lightning appeared from thin air like The Flash ran through your room, everywhere became chilly. 🥶
The moment you get to the door, a voice that sounds very familiar calls out your name. You turn, locking eyes with an older version of you.
“Don’t be afraid, I’m you from the future. Please sit, we don’t have a lot of time.”
The ‘future you’ spoke of the big UX design projects you’d soon embark on and even went on about tools that made it to the future, when you interrupted…
“So should I go ahead and pay for this design tool?”
“You bet!” they replied. “In fact, get a note and write down these tools I’m about to tell you. They’ll make life much easier for you.” 🤓
Table of Contents
An overview of the design process
Collaboration and feedback tools
Wireframing and prototyping tools
An overview of the design process
When most people begin their design career like you are, they think finding one tool is all they need to get started.
However, it’s understanding of the design process (and its pairing with the right tools!) that matters.
In other words, UX design requires a collection of tools to get the job done.
To identify these tools, get familiar with the design process we review below.
Step #1: Empathy
The first step in the UX design process is understanding your target audience and their struggles.
What’s the point of creating an eye-catching design if it doesn’t meet the needs of your audience?
The empathy phase involves conducting user interviews. Why?
There are multiple reasons:
- Drawing out pain points;
- Mapping the user journey to pinpoint challenges;
- Creating user personas to represent target customers.
It’s basically researching your end-users like a veteran marketer so you know what they want.
Step #2: Define
What happens with all the info you’ve gathered? You identify what problem you wanna solve.
So, take your magnifying glass. And search for clues, aka analyze the data from your research. Think about the main goals of your project.
Here’s an example. Do you want to increase tea consumption among young people? Then, put the problem from your users’ perspective. What does your target audience need to drink more tea? Maybe more affordable tea sets.
You can find problems in two ways. By writing down either a ‘how-can-we’ problem statement or the actual challenge they’re faced with.
Step #3: Ideate
Grab a notepad, reader. And put on your thinking cap. It’s time to brainstorm some ideas.
At this point, you have all the info you need. With this solid background, you and your team members can start finding solutions.
A great tip? Stray from the norm. It’s a judgment-free zone. Where you can explore new angles and think outside the box. So, get crazy!
There are many ways to do it:
- Brainstorm ideas with colleagues and stakeholders.
- Check out the competition and see how you can improve on what they do.
Just note down anything that comes to mind and don’t try to shape it into the perfect solution yet.
Step #4: Prototyping
You know what prototyping is? Taking those genius ideas kicking around in your head. And bringing them to life.
No pressure, though. 😂
To do that, create user flow diagrams, wireframes, and design prototypes that represent what you have in mind.
Step #5: Test
Share the prototypes with real users so they can try them out and share their feedback. You can do this via user testing and semi-guided testing.
It’s important to note that these steps don’t follow a sequential order so you may not have to do them one after the other.
With that out of the way, it’s time for the good stuff.
Collaboration and feedback tools
Ready…
Set…
Go!
Time to start your design project! Are you ready? We hope you are. This is the part where you collaborate with colleagues, clients, and higher-ups.
Plus, you’ll learn things like what’s expected of you. Or what you need to improve. And how to get clarity.
That’s where collaboration tools come in. They’ll help you:
- Stay in sync with everyone involved in the project.
- Improve productivity.
- Streamline your review and approval process.
- Collaborate with colleagues.
Here’s a list of top collaboration tools you might consider adding to your tech stack.
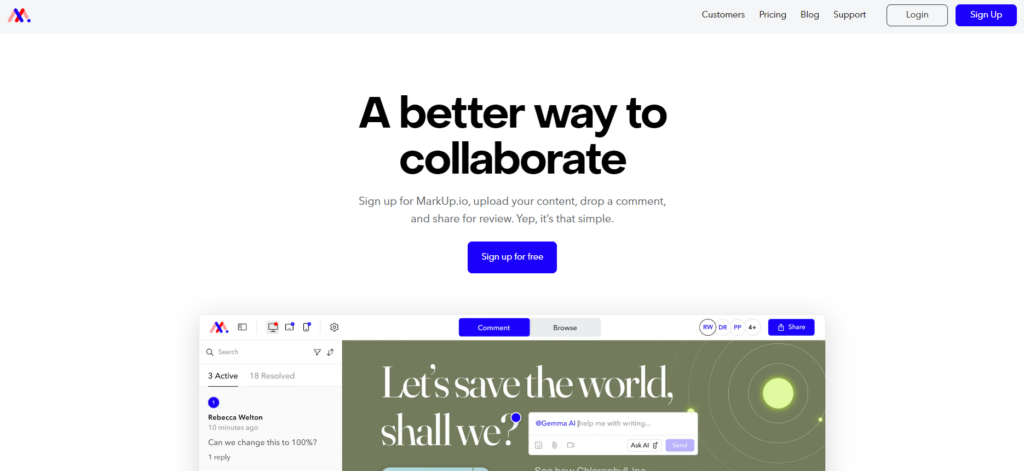
Tool #1: MarkUp.io
MarkUp.io is one collaboration tool that’s dedicated to making life easier for UX designers and creatives in general.
How?
By improving the quality of communications they have with colleagues and stakeholders.
You see, when most people think of collaboration, their first thoughts usually fall into one of these categories:
- Taking screenshots of designs at different stages. Do you also have a huuuge folder filled with screenshots? Or is it just us?
Then, you know how time-consuming this process is. MarkUp.io makes reviewing designs easier. And saves you storage space.
- Sending back-and-forth emails with the screenshots attached. Ping! Another email notification. You stare at it with dread. What now?
You lost count of the many email threads. Each has a different subject. And it’s confusing.
An annotation tool like MarkUp.io centralizes all feedback in a single place.
- Jumping on Zoom meetings while sharing your screen. You try your best to explain the concept in a Zoom meeting. But you don’t have the tools to do it properly.
It only leads to more confusion, frustration, and misunderstandings. A screen annotation tool helps you get your point across. And keep all on the same page.
- Creating a Telegram or WhatsApp group to share updates. You have too many groups on WhatsApp and Telegram. It’s annoying at this point. Plus, the notifications on your phone drive you insane.
MarkUp.io keeps you updated. But in a non-annoying way, promise.
Sounds like a lot, right?
Well, MarkUp.io transforms the complex feedback process into a simple one. It’s where all collaboration and communication are done in one location.
You know what this means? No more taking screenshots of your design. Or sharing it via Dropbox. You also say ‘goodbye’ to sending follow-up emails.
Instead, you upload the design to the platform. Add comments. And share it with collaborators.
These collaborators reply to your comments. And add new ones by clicking anywhere on the file.
✨Easy-peasy!
Here’s what you can do with MarkUp.io when working on a UX design project:
- Upload different file types. Create web versions known as MarkUps. Think HTML, PDF documents, live websites, and more.
- Share MarkUps with teammates via a URL.
- Tag team members using @mentions or @projects to notify everyone.
- Upload attachments to comments for visual context.
- Record explainer videos and add to comments, thanks to our Loom integration.
- Stay up-to-date with the review process.
Key features
Think of MarkUp.io as a personal assistant. It makes the life of a UX designer way easier. Simpler.
It probably even takes on more responsibility than a PA with features like:
- Annotations on different file types.
- Instant notification when updates are made to the project.
- Custom workflow with the Zapier integration.
- Easy tracking of changes and updates.
Pricing
MarkUp.io offers two paid plans.
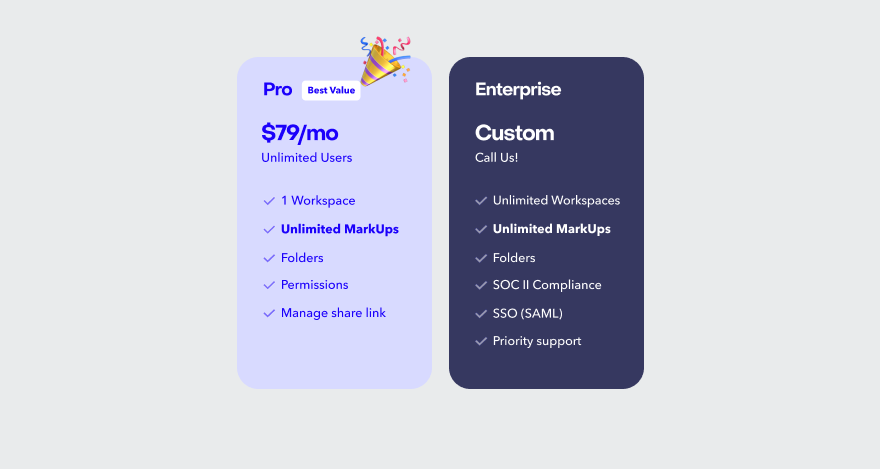
The most popular option, the Pro plan costs $79 per month. It includes one Pro Workspace, unlimited MarkUps, unlimited users, 500GB of cloud storage, advanced organization tools like Folders, and the ability to manage shared links.
Custom-priced for larger teams and organizations, the Enterprise plan offers unlimited Pro Workspaces, unlimited storage, advanced security features like SOC II compliance, a dedicated Success Manager, priority support with a 99% SLA, and custom onboarding.
Tool #2: Slack
Wanna ensure you and your teammates stay on task and aren’t caught slacking?
Then, you should probably think of using Slack.
Slack is a communication tool. It makes sure you and everyone involved in the UX product design collaborate in real time.
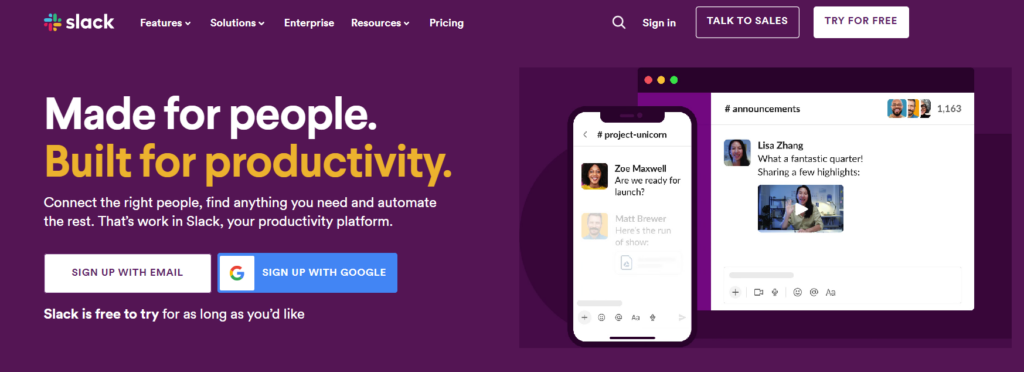
It’s simply a platform where people chat via text, huddles, voice notes, GIFs, and emojis. Plus, users set up different groups on Slack for each step of the design process.
And enable streamlined interactions between collaborators.
We’ll let you in on a li’l secret. 🤫
Did you know you can even connect MarkUp.io with Slack? Yup, you can!
Thanks to MarkUp.io’s integration with Slack, you collect real-time feedback from everyone involved.
And be instantly notified whenever someone crafts new MarkUps. Or adds comments and replies.
Key features
Slack is listed as a collaboration tool because of its different features, including:
- Huddles for real-time virtual meetings.
- Instant messaging.
- Slackbot for automatic reminders.
- Integration with apps such as Google Drive, Zapier, Figma, and more.
Pricing
Slack has four pricing plans available — a free version and three paid, starting at $7.25 per month.
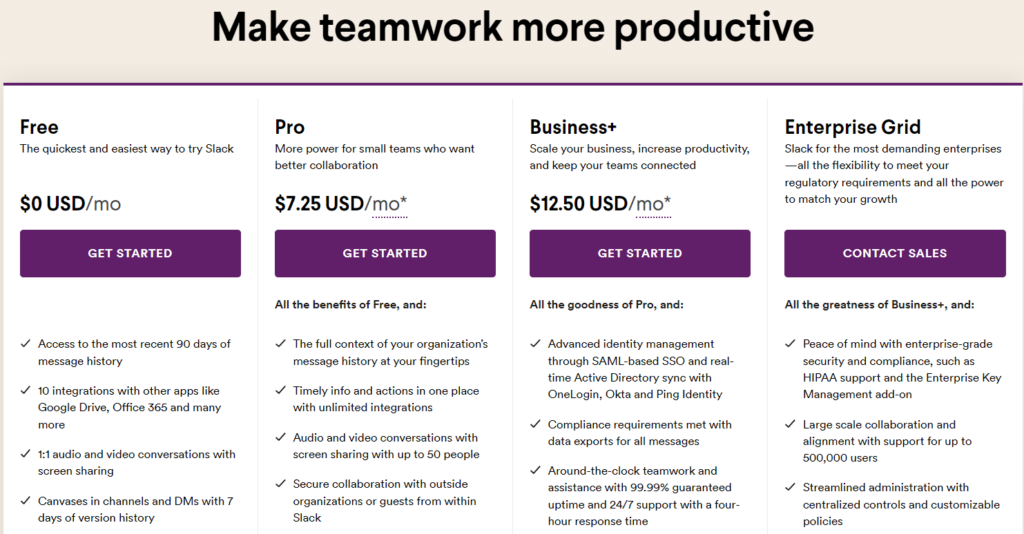
There’s an Enterprise plan too, available on demand for large organizations.
Tool #3: Miro
Miro has a simple philosophy. You come with high hopes and a big dream. And you exit with the next big thing. 😉
It’s your visual workspace for innovation. It’s a place where creative teams can brainstorm and come up with ideas.
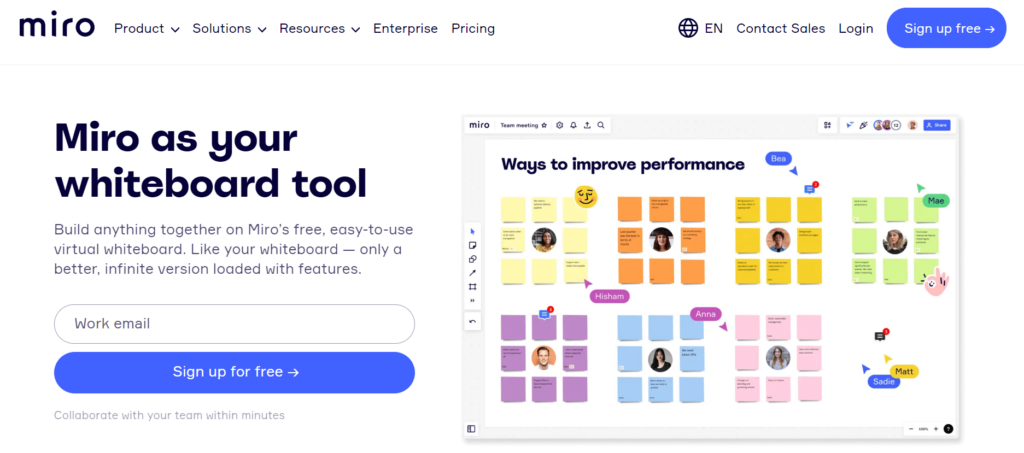
Miro features a whiteboard. It’s a place to engage in remote productive meetings. And share ideas in real time.
Imagine those closed-door meetings you have at the office. Where you have a whiteboard. And write on it.
Miro is a whiteboard in a virtual setting.
And you’ll even hear the design team’s voice. Like you’re in a Zoom meeting. Or you can express yourself using emojis, sticky notes, images, and a whole lot more.
Key features
Here are some features that come with Miro:
- Templates if you’re not sure how to get started.
- Voting so everyone can contribute and reach a consensus.
- Clustering to group sticky notes and sorting them based on author, tag, color, etc.
- Timer to keep track of time during brainstorming sessions.
- Mind map to organize and structure ideas.
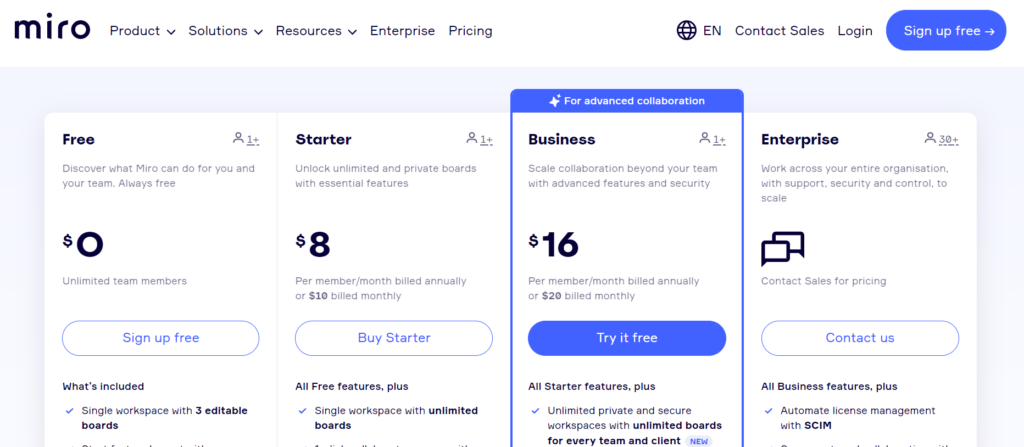
Pricing
Miro also has four pricing plans. It’s got the:
- Free plan with one workspace and three editable boards.
- Starter plan that costs $8 per user, per month for one workspace and unlimited boards.
- Business plan starting at $16 per member, per month for unlimited workspaces and boards.
- Enterprise plan which is only available on request.
Should you add a collaboration tool to your quiver? Yep! It’s a great place to start in the design process.
But they won’t help you study your audience or understand their needs.
Let’s look at solutions that can help research your end users.
User research tools
Researching the audience is a vital part of the UX design process. It’s like prepping ingredients before making a meal.
If you do it right, you have a delicious meal that’ll make an Oliver Twist out of anyone.
…and if you don’t, the meal might end up being wasted.
Here’s a list of tools that can help you get well-prepped for a UX design project.
Tool #4: Wufoo
While Wufoo almost sounds like tofu, they aren’t related.
Wufoo is, however, a digital form builder. It helps you create forms such as surveys to collect data from your target audience.
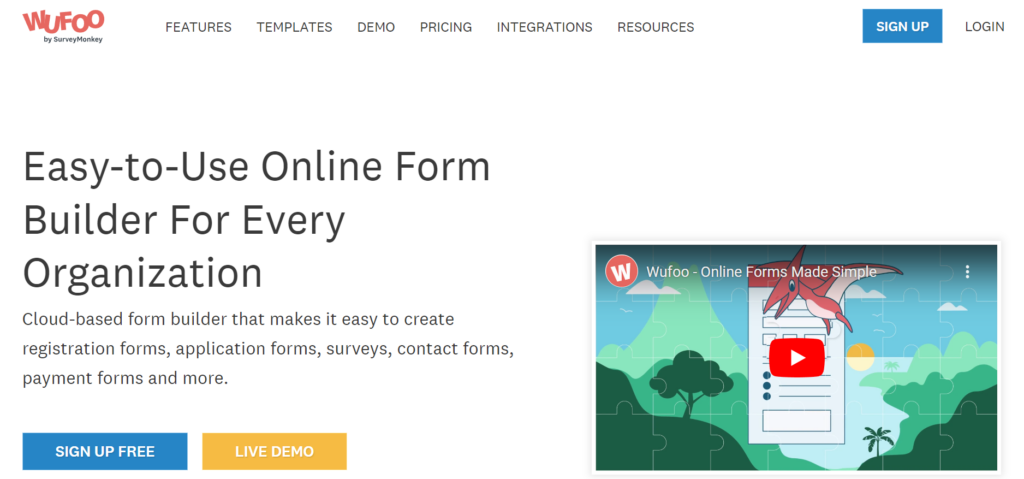
With this tool, you’ll have access to templates you can customize with logos and brand colors. You can also edit the templates to add different fields and questions you want included.
More importantly, Wufoo allows designers to design the best UX. How? By analyzing data. And tabulating the results collected from the survey.
Key features
Wufoo can be a research tool for your UX design project because of specs like:
- Custom reports to help you understand data collected from the audience.
- Social sharing to share forms on social media platforms.
- Field validation so you’re sure received data remains as received.
- Integration with third-party apps like MailChimp, Zapier, and Campaign Monitor, to automate workflows.
Pricing
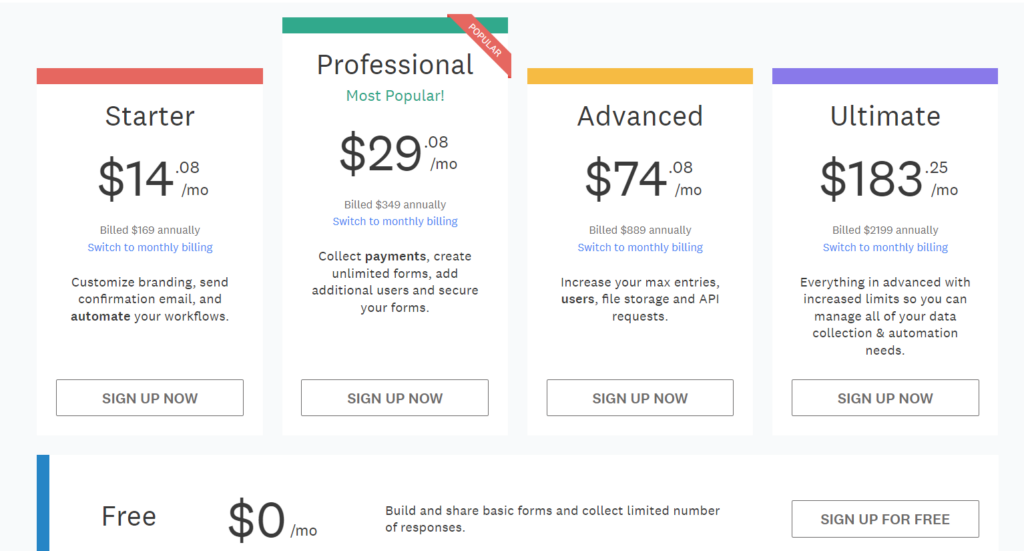
Wufoo has five plans:
- Free plan.
- Starter plan: $14.08 per month.
- Professional plan: $29.08 per month.
- Advanced plan: $74.08 per month.
- Ultimate plan: $183.25 per month.
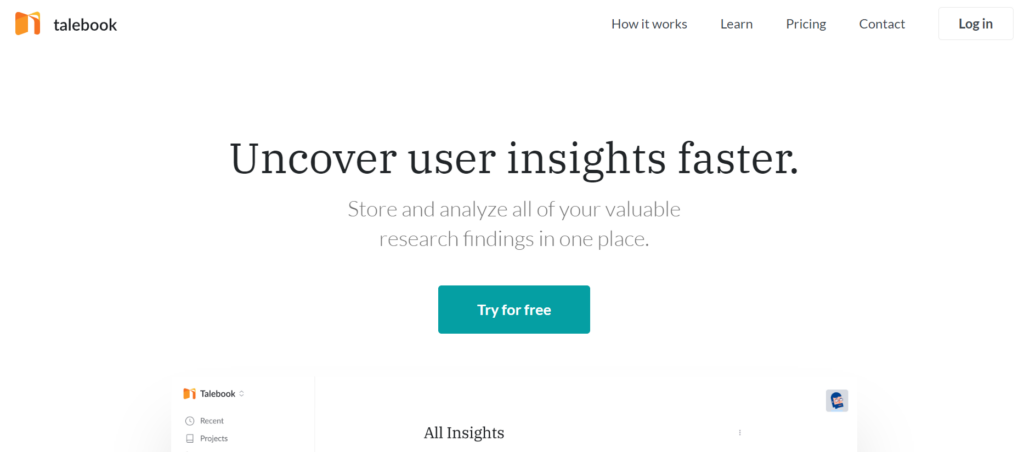
Tool #5: Talebook
Quality products are kinda like bards if you think about it. They’ve got that magical gift of song to recount their users’ journeys from pain points to hallelujah moments.
Your responsibility as a UX designer is to learn about pain points. The goal is to come up with the appropriate solutions.
That’s where Talebook comes in. It’s a platform for researching the audience and their challenges. With it, you conduct user interviews, analyze rivals, and perform stakeholder interviews.
Talebook has pre-made templates. They help you get started. And acts as a guide to teach you how to hold interviews the right way.
Talebook helps you explore your findings. And identify patterns.
Key features
Talebook covers some important features in user research such as:
- Tags to organize your research and make important info visible.
- Insights to manage and have easy access to data.
- Interactive templates for each activity on Talebook.
Pricing
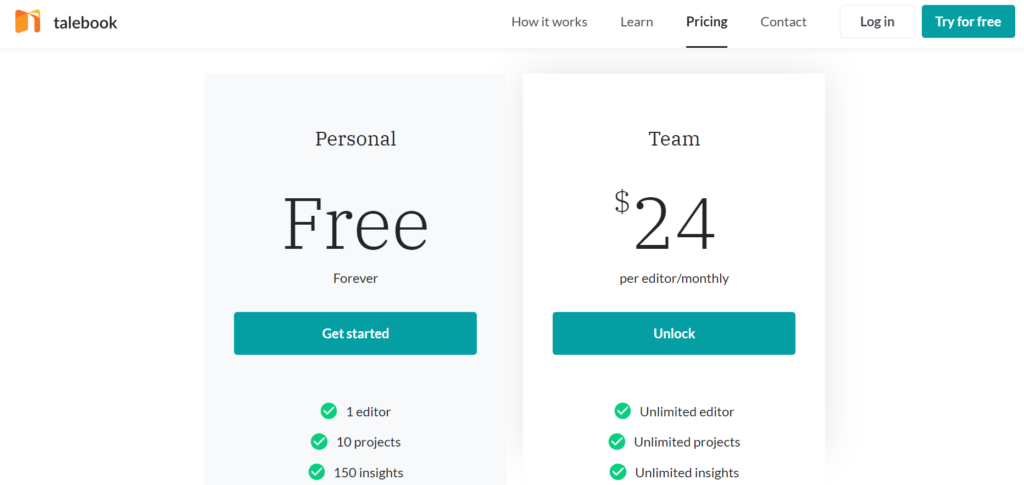
Talebook offers only two pricing options — a Personal plan for free and a Team plan at $24 per editor, per month.
Tool #6: UXtweak
Here’s a buzzworthy research tool for your UX projects.
Make a beeline for UXtweak! A cute bee-themed software with the resources you need to understand what users need, think, or feel.
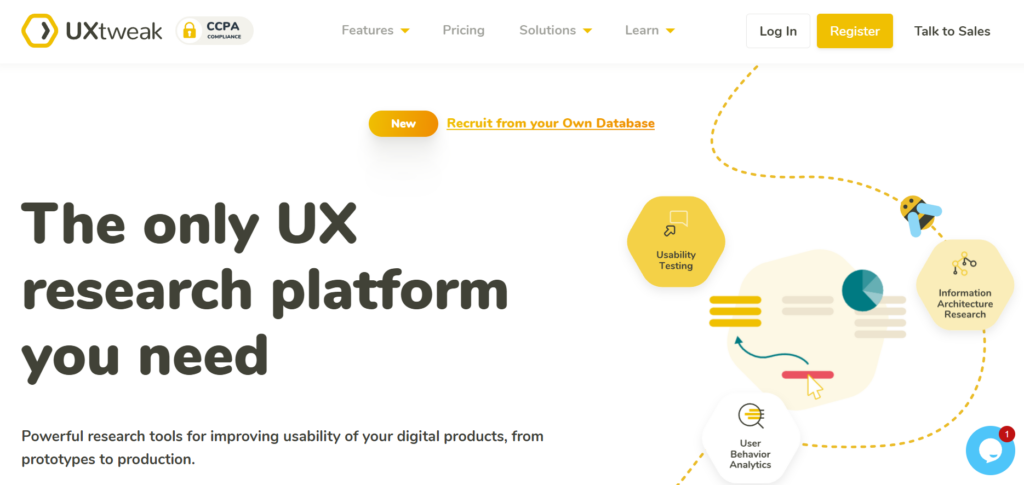
The people at UXtweak even refer to their tool as ‘the only UX research platform you need.’ Are they right about that? Well, here’s what you can do with this research tool:
- Conduct surveys to research users and collect feedback.
- Perform preference tests to compare which outcomes best communicate ideas to users.
- Session recording to track the user’s journey on your digital product.
Key features
UXtweak is packed with some exciting features such as:
- On-site recruiting to get feedback and opinions from users.
- User panel to help you recruit people for user research.
- Rating scale to help users select multiple options during a study.
- Reports to provide insights when the research is complete.
Pricing
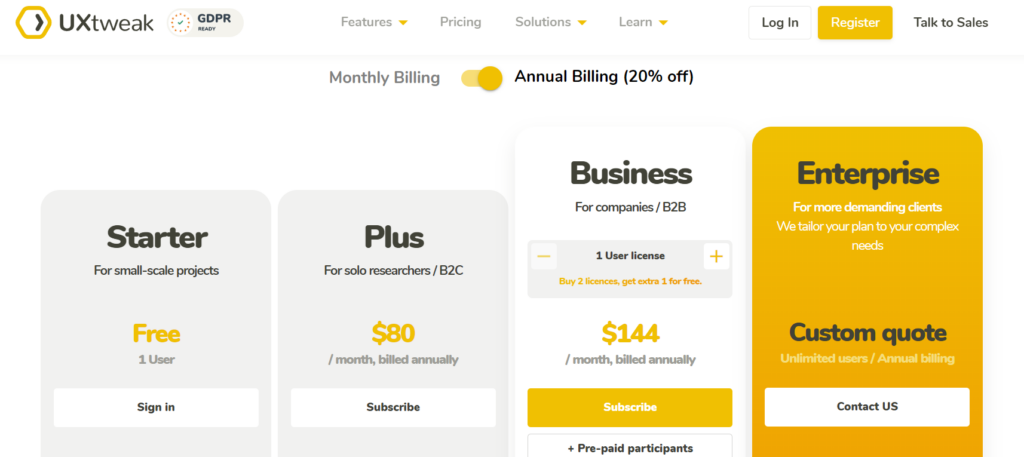
Whether you’re working on a tight or huge budget, this research tool has got you covered. There’s the:
- Starter plan: free for one user.
- Plus plan: $80 per month.
- Business plan: $144 per month.
- Enterprise: available on demand.
***
User research tools get into your users’ minds. You’ll understand their pain points. And find the right ideas to solve them.
But how do you know that idea would work?
…You’re not the mind-reading Charles Xavier after all.
Materialize the idea by creating wireframes and prototypes people can see and interact with.
Wireframing and prototyping tools
Wireframing is the process of laying the barebones of your design. It’s kinda like a skeleton.
And no. Sadly, it’s not Halloween. Put your costume back in your wardrobe.
It’s simply a way to visualize how your design works for the user. And ensure every element is clear.
So, how can you craft the best wireframes and prototypes? Besides from using your imagination.
By using one of these UI tools for building interactive interfaces for users.
Tool #7: Balsamiq
Balsamiq is an easy-to-use tool designed for creating low-fidelity wireframes.
It recreates paper sketching, but this time on your personal computer. Balsamiq is an ideal tool for when you’ve got an awesome idea in your mind that you need to share with others.
Use the hand-sketched styles without bothering to create perfect designs.
Balsamiq focuses on functionality. You keep iterating the sketches till you reach the ideal solution. Plus, it has a simple learning curve.
Key features
Balsamiq offers several cool features, including:
- Wireframing academy where you’re taught how to wireframe projects from scratch.
- UI components & icons featuring in-built UI icons to be used when wireframing.
- Reusable templates you can add to your library for future projects.
- File conversions to display wireframes as a web, PDF, or image file.
Pricing
Balsamiq has a unique pricing system.
You can either opt for a one-time license for the desktop app (macOS or Windows) that costs $129. Or subscribe to any plan on the Balsamiq web app.
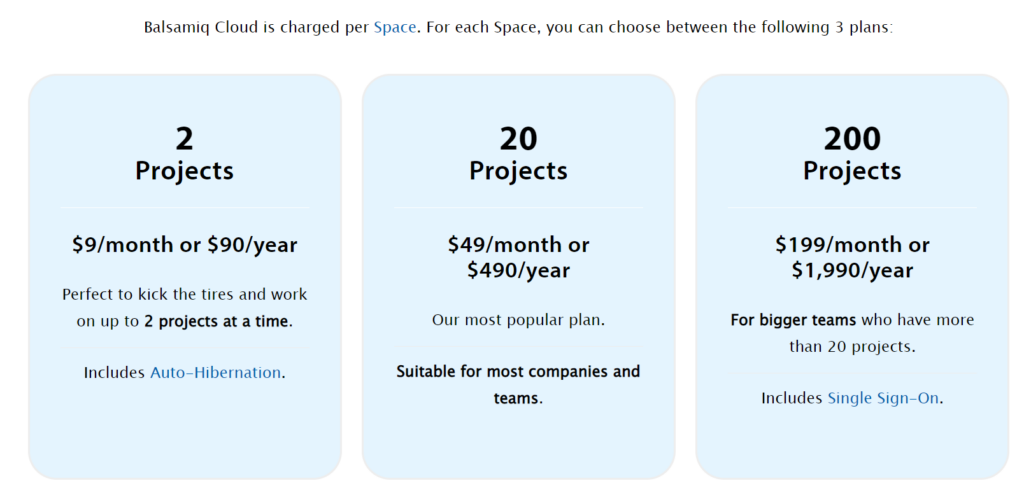
The web app subscription features three plans:
- 2 projects at $9/mo.
- 20 projects at $49/mo.
- 200 projects at $199/mo.
Tool #8: Moqups
Moqups is another simple wireframing tool you can add to your stack.
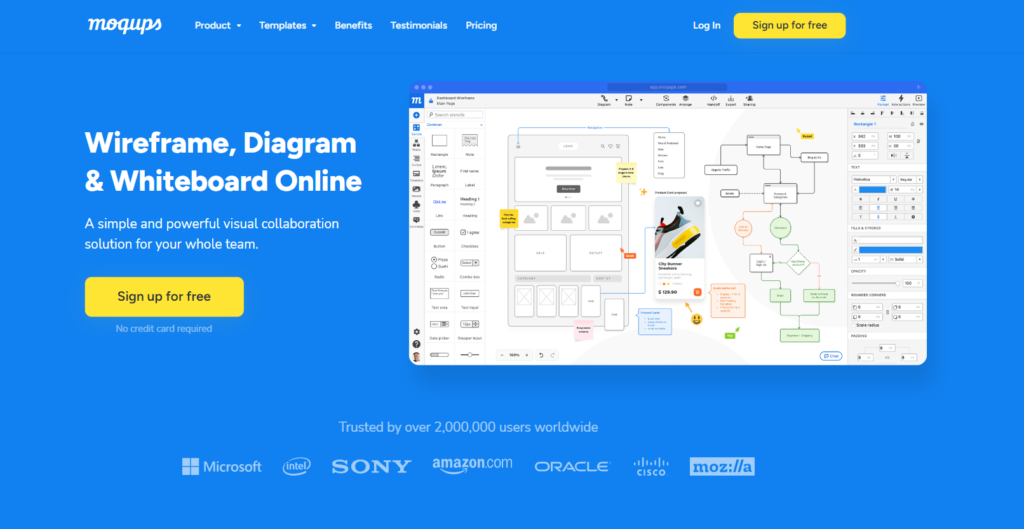
It comes with a drag-and-drop you can use in creating professional wireframes for your UX designs.
You can also use Moqups to create mockups, flowcharts to document the user’s journey, and prototypes to simulate the user’s experience.
There’s even a digital whiteboard that allows you and your teammates to create diagrams together in real time.
Key features
Moqups functions as a wireframing and prototyping tool because of features such as:
- Page management to help you handle complex projects.
- Object editing to style and transform objects when creating wireframes.
- Digital stencils to create smart shapes.
- Fonts so the text used matches your design.
Pricing
Moqups offers four types of plans users can choose from:
- A free version to give you a taste of how it works.
- Solo plan: $17/mo.
- Team plan: $32/mo.
- Unlimited plan: $89/mo.
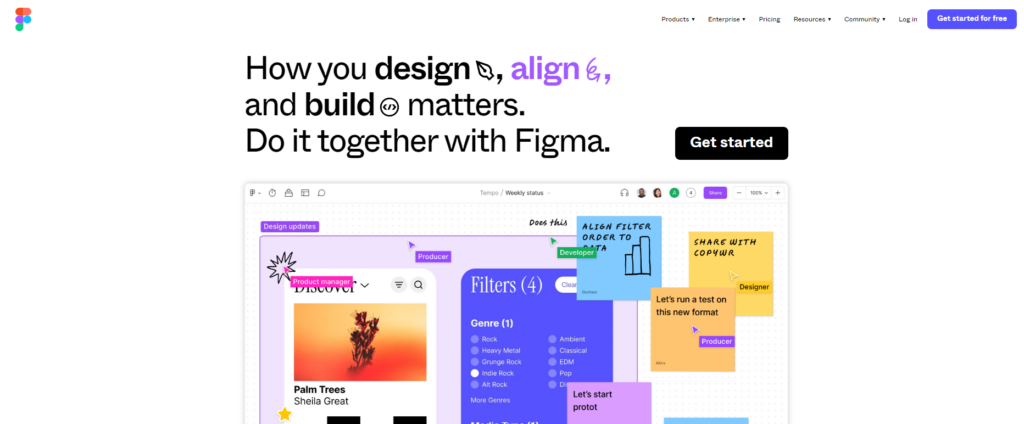
Tool #9: Figma
Ah yes, Figma – one of the top UX/UI design tools in the tech space. This piece wouldn’t be complete without it.
Figma is a design tool. But UX pros can also use it to collaborate. And create graphic designs, interactive prototypes, design systems, and user interfaces (UI).
That means you can co-create diagrams or designs with team members on this design tool.
With Figma, you can create realistic prototypes making it easier to test and get feedback. And if you have any cool ideas, it’s got a ton of plugins that can help you bring them to life.
Key features
Figma is stacked with useful features such as:
- Interactions to connect prototype designs and give them life.
- Conditional logic defines what an action would trigger.
- Smart animate for creating smooth transitions in a prototype design.
- Dynamic overlay to show one content flexibly over another.
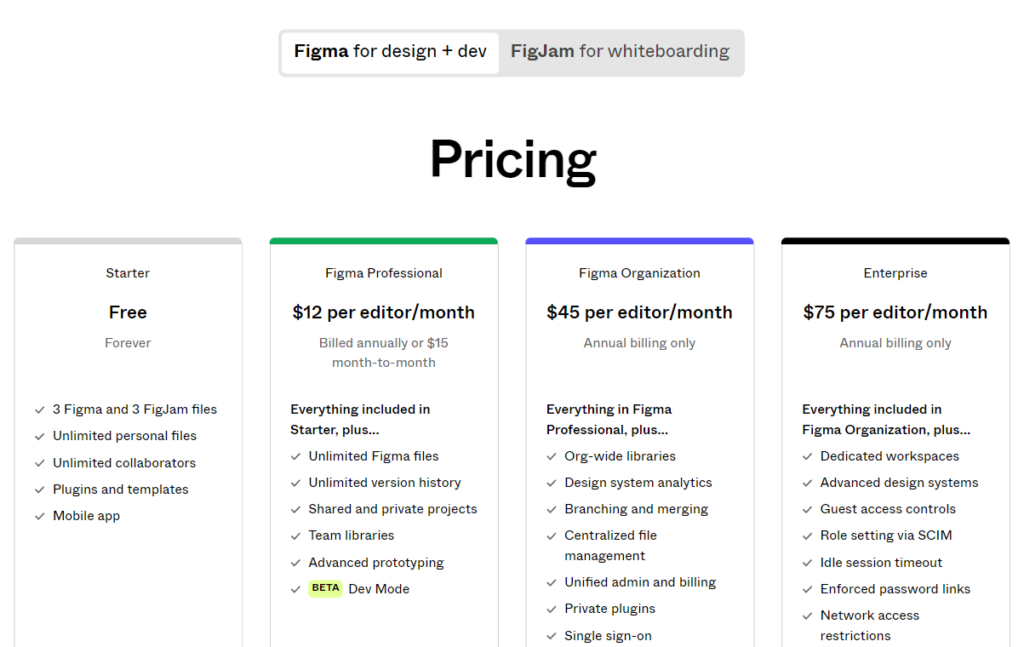
Pricing
Figma has a simple pricing structure:
- A free version.
- Figma Professional plan at $12 per editor, per month.
- Figma Organization plan at $45 per editor, per month.
- Enterprise plan at $75 per editor, per month.
Tool #10: Adobe XD
If you’ve never heard about Adobe XD, you’ll probably have heard of Adobe Acrobat or something related at least. It’s a software company dedicated to building tools for creatives, like Adobe XD.
XD is a design platform for creating wireframes, high-fidelity prototypes, interface designs, and digital experiences.
Key features
Adobe XD helps you communicate your ideas clearly with prototypes, using features such as:
- Auto-animate transitions to define micro-interactions between different static designs or artboards.
- Drag gestures for transitioning between designs.
- Overlay interactions to add some magic to user interface (UI) elements.
- Voice recognition to control the transition from one artboard to another.
Pricing
Adobe XD is part of Adobe’s Creative Cloud with over 20 apps for a monthly fee of $54.99.
***
Are there any other prototype tools? Yep. These are InVision, Framer, Marvel, Origami Studio, FlowMapp, Proto.io, and UXPin.
Use these tools to visualize possible solutions for your audience’s challenges.
But does wireframing actually help meet user needs? For an answer, you need to conduct user-friendly usability tests.
That takes us to the next section.
User testing tools
Imagine you’re at the last question in the reality show, Do you want to be a millionaire?
It’s your moment of glory. One correct answer. And you’ll win the jackpot. You expect to breeze through it. It’s gonna be easy.
But then the question comes. In the design process, how do you know your hard work has paid off?
You’re stumped. Was there anything else you missed?
Yep. It’s the testing phase. Here’s where you know if you did a good job. Or if you need to go back to the whiteboard and brainstorm more.
It’s like a qualifying exam for your ideas.
Well, here are some tools that’ll let you know if you passed or need to try again.
Tool #11: UserTesting
UserTesting is a platform that gives you insight into what users think of your product.
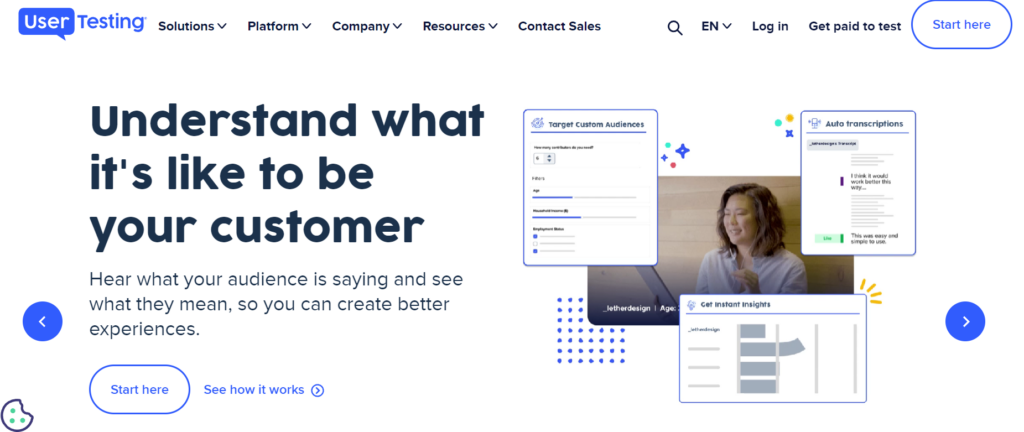
Using the tool is simple. Just upload the animated prototypes you’ve designed and invite users to test them.
Speaking of users. This tool helps you find a target audience to review the product. Or connect with your existing audience directly.
UT then allows you to watch the user’s journey while they interact with your product. Plus, their Human Insight Platform records your user’s reactions. And lets you hear what specific aspects excited them or didn’t.
Key features
Here are some features that make it possible for you to understand users on UT:
- Audience services, if you need users who can test your product.
- Demographic filters to streamline your target audience.
- Video capture and live streaming to record customer experiences in real-time.
- Test-plan builder to help you launch the test campaign.
- Intelligent insight to identify path flows and key moments in the user’s journey.
Pricing
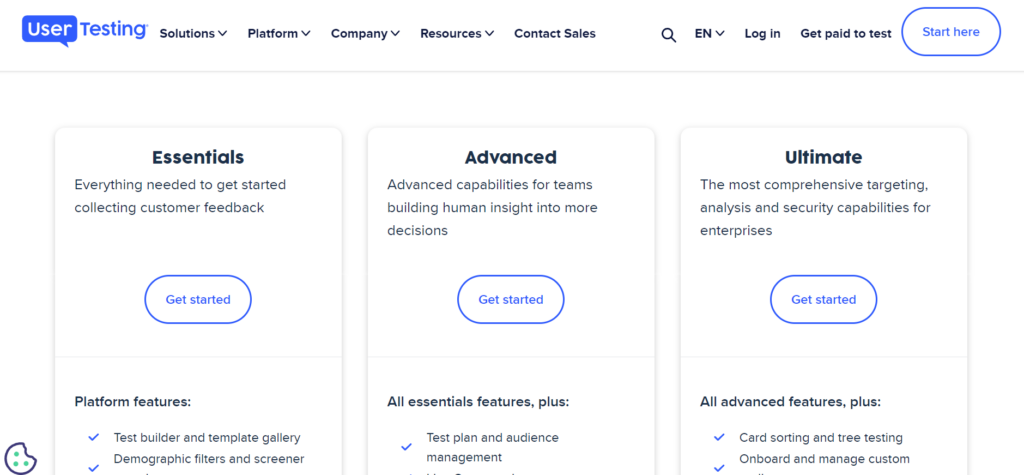
UserTesting offers three paid pricing plans – Essentials, Advanced, and Ultimate.
But unfortunately, you have to ask UT for the actual prices.
Tool #12: Userbrain
Ever wished you knew what your target audience thought about? Perhaps that’s why ‘the digital genie’ built Userbrain.
It’s a simple tool you can use to create user tests to find out what works with your target audience and what doesn’t.

Here’s how it works:
- Set up tasks to be tested.
- Select testers from Userbrain’s pool or import your audience.
- Get videos of testers interacting with the product.
Key features
Features in Userbrain’s quiver include:
- Easy setup with pre-built templates.
- Presentation-ready reports for swift decision-making.
- Transcripts to analyze feedback faster.
- Team collaboration so teammates can comment on or assign files.
Pricing
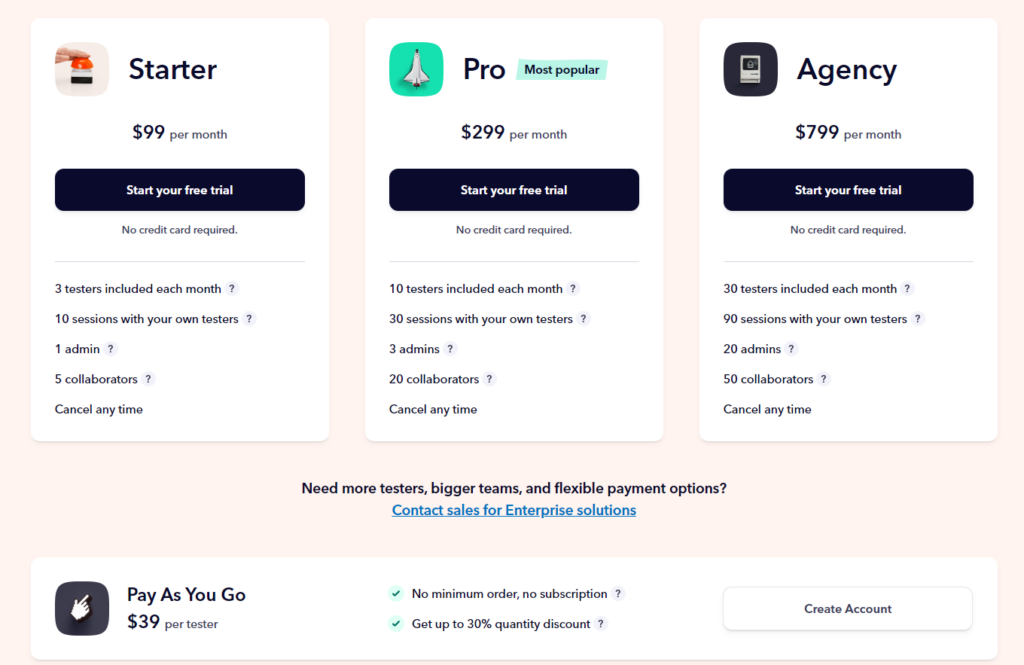
Userbrain offers five paid plans for you to choose from:
- Pay-as-you-go at $39 per tester.
- Starter plan at $99/mo.
- Pro plan at $299/mo.
- Agency plan at $799/mo.
- Enterprise available on demand.
***
Now the feedback you get from the testing stage gives you two choices.
You improve the solution, if the feedback’s ‘mid’.
You perfect the design (and release the final product) if the feedback is really good.
So, if you get good reports, get ready to hand off your UX design to a developer.
Design handoff tool
After perfecting the visual aspect of your design project comes the hard part — handing it off to developers.
This process is usually frustrating, to say the least, because of one silly protagonist known as Code.
And the handoff must be smooth because if the developer doesn’t get what they need, all your hard work will have been for nothing.
You don’t want that now, do you?
That’s why you need designer-developer handoff tools. Here are two you can use.
Tool #13: Zeplin
It’s not Zeppelin, the balloon-like airship.
And no, it’s not the band, Led Zeppelin.
It’s simply Zeplin. A unique name that sticks with you. And it’s fun to say!
Zeplin is a collaboration tool that lets you hand off design prototypes to developers so they code everything correctly.
You can use it alongside Figma, Adobe XD, and Sketch. It means you’ll have no difficulty translating designs to code.
Key features
Zeplin features are as classy as they are important and include:
- Real-time collaboration so you have a streamlined workflow with everyone on the same page.
- Swift design translation to CSS, native C, Android, and React Native code.
- Track changes to shared designs so you can keep track of what’s changed.
- Generate RGB and Hex color values for design elements.
Pricing
Zeplin’s pricing structure is based on a per-seat basis:
- Free plan.
- Team plan at $8 per seat/mo.
- Organization plan at $16 per seat/mo.
- Enterprise version only available upon request.

***
…‘Future you’ was still describing the Inspect tool when they suddenly disappeared.
Armed with what they’d shared, you knew this moment was a turning point.
They had lit the fire; it’s now your destiny to fan it into flames and become the greatest UX designer of all time.
Over to you
As you turned back to your PC to purchase the design tool you were assessing when ‘future you’ appeared, you saw a small note by your workstation. It read…
“And if you ever get stuck on your UX design journey, turn to MarkUp.io’s blog. It’s got resources that’ll help you keep the flame burning.
MarkUp.io will also help you simplify collaboration between your team and stakeholders, so everyone is on the same page.
Sign up for a free 30-day trial with MarkUp.io and experience a smooth workflow. ”
So don’t just take our word for it. Listen to ‘future you!’ 😉