
Editing a video is a lot like conducting an orchestra — Yanni’s specifically.
Just like a conductor directs and harmonizes different instruments, tempos, and melodies to create a beautiful symphony, an editor weaves audio, visuals, and emotions to create a cinematic masterpiece.
But remember, one wrong wave or wonky keystroke, and you’ve got an audience reaching for earplugs faster than you can say “cut!”
That you wanna avoid at all costs.
To keep your editing game sharp and your videos more addictive than cat memes, you need to be up-to-date with the latest video editing techniques.
Here are some tips to help you stay on top of your editing game and produce better videos.
Table of contents
- Always consider the story
- Pacing can make or break a project
- Become a master at using your software
- Use B-roll scenes in sets of three
- Use split ends over Dragnet style
- Cut on action
- Pay attention to color grading and color correction
- Experiment with transitions and effects
- Make tight cuts and edit out mistakes
- Choose the right music
- Take a break from the project
- Backup your files
1. Always consider the story
Every video tells a story — for a product launch, case study, or advertising. This is the secret sauce that keeps your audience hooked and hungry for more!
So, when you’re slicing and dicing those video clips, your mission is to capture the heart of your message and knit it into a compelling story your audience can’t look away from.
For that to happen, you must understand the elements needed in a story.
Things like
- Conflict: Think of this as the heartbeat of your story. Without it, your video would be as exciting as watching paint dry. This is the character’s battle against hurdles, whether they’re physical, emotional, or internal.
- Stakes: What’s on the line for the character? What’s at risk, and what could they gain? This tension keeps your audience on the edge of their seats!
- Character development: This should be someone the audience likes and can resonate with. They want to see this character tackle those obstacles, especially when the stakes are sky-high.
- Transformation: This is the grand finale, the fireworks show, the climax! How has overcoming those obstacles changed or evolved the character? If this is an ad video, think of this as your ultimate selling point.
As a video editor, your role is to sift through the video footage and unearth narratives you can weave into a captivating story viewers will love. Here’s how you can do that:
- Review every inch of your video footage. Get to know your characters like they’re your best buddies, immerse yourself in the story’s context, and familiarize yourself with the settings.
- Look for those golden plot points and emotional highs and lows that can propel your story forward.
- Choose the cream of the crop when it comes to takes. The best ones will align your visuals with your message and stir up emotions viewers can connect with.
- Keep an eye out for moments of tension, action, and shifts in pace and rhythm in your video clips. These can help you create a flowing narrative that keeps your audience hooked.
- Explore opportunities to jazz up your audio and visuals to enhance the story further.
Remember, keeping your story at the forefront of your mind can help you craft a memorable visual experience.
And with the right pacing, you’ll have viewers sticking to their screens like superglue, eager to see what unfolds next.
2. Pacing can make or break a project
Think of video pacing as the pulse of your story. It’s the speed at which your plot gallops, determined by the length of movement and dialogue and even the rapidity of camera shots. It’s like the story’s rhythm section, setting the pace for the viewer’s emotional roller coaster ride.
When you nail the pacing, it can supercharge your audience’s viewing experience and keep them latched onto your story.
When it comes to pacing styles you can play with during editing, here’s the trio to consider
- Sluggish pacing: Imagine it like a slow, intriguing dance that pulls your audience in and heightens their curiosity.
- Quick pacing: This is your adrenaline-fueled race car, perfect for showcasing fast and furious action.
- Standard pacing: This is the chill friend who brings balance, bridging the gap between the slow and fast extremes and keeping your viewers comfortably engaged.
Remember, your video’s pacing should harmonize with your visuals and audio. It’s like the well-tuned orchestra analogy that opened in this piece (remember that?). Everything needs to be in sync for a flawless performance.
Ready to set the pacing for your video? Here are a few handy tips to guide you:
To define the pacing of your video, here are some tips that can help you:
- Start with scripts and storyboard: Pace begins pre-production when you’re planning the video shoot and editing workflow. If a scene conveys an intense message or might be confusing for viewers, you need to plan for lots of shots, cuts, and movement. On the other hand, for a slow, emotional scene that demands thoughtfulness, opt for longer shots, gentle movements, and fewer cuts.
Pacing is something you need to think about right from the get-go, even while penning down the video script. It helps you visualize the necessary camera moves and movements to pump up the pace and speed.
- Approach production with pacing in mind: Like a videographer shooting the footage, you should understand how pacing weaves into each shot. Ask yourself: Do the characters move at a pace that aligns with their intentions? Should the camera dance along with them or stay put?
Do the shots echo the character’s emotions and create the desired vibe? Answering these questions can help you control the pace of the video.
- Create momentum through movement: Once you’ve got a solid understanding of pacing, bring it to life by moving your camera or characters as you transition from one scene to the next. This can build momentum and keep your viewers glued to the screen.
Brandon Li, a nomadic filmmaker, also has some ideas to help adjust the pace of your video, depending on the effect you’re aiming for.
If you’re short on time, here’s a quick rundown of his advice:
- Watch a music video with and without the music. Why? Music videos are all about rhythm. However, not all the editing is synced to the song’s beat. Some music videos are edited against the song’s beat (it’s called syncopation for you music buffs). This creates an engaging storyline that piques viewer curiosity, making them eager to see what comes next.
- Start editing with well-paced music: You can do this whether the final cut has music or not. Editing with music gives the project a base you can work off of when you’re done. Consider choosing music that gradually builds intensity, echoing the energy in your video.
- Take a break from editing: Step away from your work and do something different. Go for a walk, make a cup of tea. When you return to your editing, you’ll have a fresh perspective to spot anything you may have overlooked.
The long and short of it is that nailing the right video pace can keep viewers glued to your content, much like the magic of Christopher Nolan’s videos.
He’s a master at balancing fast and slow scenes.
But setting the pace of your visuals means you need to have some serious skills when using video editing software.
3. Become a master at using your software
Just like the conductor leading the orchestra needs a baton, every skilled professional needs the right software to help them carry out their jobs properly.
To improve your video editing skills, you need to become proficient in using tools that can help you streamline the video editing process.
Here are a few of the best video editing software programs you might wanna get acquainted with:
1. Adobe Premiere Pro
A popular video editing tool, Adobe Premiere Pro provides effects, collaboration, color tools, and output options editors need for their projects.
Some other features include:
- Auto reframe to automatically adjust keyframes to taste.
- Multi-camera angle editing for recording angle changes when the composite video plays.
- Audio editing panel showing VU panels and clipping indicators, among others, to adjust the project as it plays.
- Automatic transcriptions and subtitles for producing text panels from words spoken in the video.
- Warp stabilizer for smoothing out bumpy videos.
2. Final Cut Pro
Final Cut Pro is Mac-based flexible video editing software with a smooth interface that supports wide color space, and a trackless magnetic timeline for adjusting clips to fit around clips you drag into place.
The editing tool for Apple users offers features like:
- Inline precision editor to fine-tune cuts.
- Trimming tools to ripple, roll, slip, and slide edits as you see fit.
- Multicam editing to sync up to 64 video angles with different formats, frame sizes, frame rates, and trim and add aftereffects and color grades to each.
- Noise reduction to eliminate grain and video noise.
- Retime clips for creating cinematic slow-motion, fast-motion, and variable-speed effects.
3. DaVinci Resolve
Node-based editing software supports editing, color correction, visual effects, audio post-production, and motion graphics. DaVinci Resolve also makes cameras that smoothly integrate with the software.
Some of its features include:
- Marking clips for refining a portion of a clip to be used in an edit.
- Timeline grid for syncing audio and video together.
- Visual meter to monitor the audio’s signal level.
- Automatic trimming to adjust the timing between clips and fine-tune edits.
- Title generators to create simple titles for clips.
4. iMovie
Apple’s iMovie is a simple video editing app that supports editing on iPhones and Mac computers. This handy tool offers preset templates, providing a roadmap for non-professional users to navigate through video footage capture, clip organization, and learning various story structures.
iMovie offers features like
- Clip connection: This helps you keep your media intact when moving a clip around.
- Precision editor: A tool that displays clip segments before and after the editing process.
- Autocorrect: A handy feature that amps up the lighting and color of your video footage.
As a professional video editor, honing your skills with these tools can catapult your capabilities to new heights.
But there’s more to a smooth editing process than mastering the tools. It’s also about ensuring everyone involved in the project — stakeholders, clients, and team members — is easily kept in the loop.
Imagine getting their feedback and approval without the stress of downloading a cut from the editing software or wrestling with email attachments. 😞
For this to happen, use a collaboration tool like MarkUp.io. 😀 This platform acts as a bridge, reducing the gap between you and your stakeholders.
All you have to do is upload the cut to the collaboration platform and invite stakeholders to leave their feedback via email or live URL.
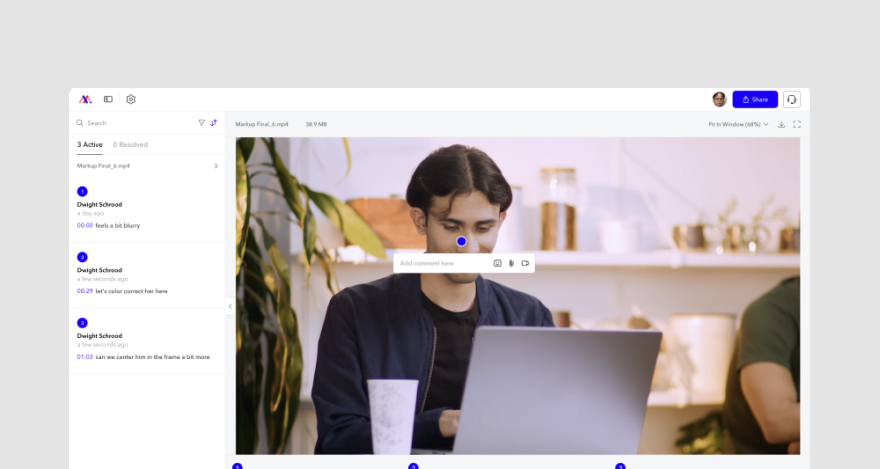
Then, without signing up, they can review and approve the cut. MarkUp.io can be used at any project point where feedback is required.
4. Use B-roll scenes in sets of three
Ever seen an orchestra perform? Then you know that some musicians are like the life of the party, with their instruments making a big, bold sound. Then some are like the quiet ones, tucked away in a corner, and you’re squinting to figure out what instrument they’re playing.
But don’t be fooled. Just because they’re not in the spotlight doesn’t mean they aren’t crucial. They’re like that hidden ingredient in your favorite dish — you might not see it, but its flavor makes all the difference.
In the fascinating world of video editing, the ‘life of the party’ musicians are the A-roll. This is the main footage that grabs your attention. The ‘quiet ones,’ on the other hand, are the B-roll. These are the unsung heroes, the ones working their magic behind the scenes.
The B-roll doesn’t showcase the main characters interacting with each other but is used to describe shots accompanying them. It can help:
- Establish a scene.
- Add depth.
- Provide context.
- Smooth out transitions.
- Add visual interest.
So, while B-roll might be playing in the background, it makes the story truly come alive.
Take, for example, supplemental footage like shots of city streets or building exteriors in a scripted video. They might be away from the main action, but they’re setting the scene and giving context to the story.
What about a scene where two characters talk about a restaurant down the street? The B-roll here could be a shot of that very restaurant, swiftly transporting your audience to the discussed location.
Incorporating these supplemental shots not only jazzes up your visuals but also makes your story more captivating.
Here’s a pro tip: mix in your B-roll with your A-roll in sets of three. This formula does wonders, ensuring
- Your story is enriched with various visuals, adding depth and context.
- There’s visual diversity, preventing the footage from being boring by showing different angles, locations, or details.
- The video has a sense of continuity, with B-roll scenes that flow seamlessly from one to another.
- Viewers are engaged on multiple sensory levels.
- Your audience’s interest is kept alive during transitions, so there are no sudden disruptions to the viewing experience.
To effectively use a B-roll, it’s crucial to have it pre-recorded. Here are a few pointers to help you when shooting B-roll footage::
- Move around: take panning shots so you can have well-paced footage.
- Take as many interesting shots as possible: shoot close-ups, wide shots, low angles, time-lapses, or bird’s-eye views for visual diversity.
- Focus on the details: your shots must illustrate important features in an environment or situation that can help you tell the story.
5. Use split ends over Dragnet style
Imagine if conversations in a video film were like a tennis match between Roger Federer and Andy Murray.
The camera would focus on the player hitting the ball, then swiftly cut to the opponent and back again.
Now, if screen conversations followed this pattern, viewers might find themselves yawning pretty quickly.
This editing style was once used in a ’50s television series called Dragnet. The formula was straightforward — cut to Actor 1, and they deliver their lines. Cut to Actor 2, they do the same. Then it’s back to Actor 1, and the cycle continues.
This method, now known as the ‘Dragnet style,’ is generally considered a trademark of novice editors.
A more effective technique is the ‘split edit.’ This is a type of transition where the audio and visual elements change at different times — meaning, the shift in the image doesn’t coincide with the change in sound.
This method enhances the film’s flow, providing viewers context before or after the dialogue. It’s a more holistic approach compared to the dialogue-centric Dragnet style.
Split edits can be used to hide transitions between shots and to edit dialogue scenes in projects where a single camera was used to shoot multiple takes.
But the use of split edits isn’t limited to dialogue. They’re also great for smoothing transitions between scenes, ensuring a seamless viewing experience.
6. Cut on action
At first glance, you might think “cut on action” involves a director abruptly shouting “cut” right after yelling “action.”
Not quite.
“Cut on action” is a simple yet effective technique used in video editing, where the cut or transition occurs mid-action or movement in a scene. It’s like slicing through the action rather than waiting for everything to go still.
Why is this helpful? Well, sometimes shifting from one angle to another can feel as jarring as a pothole on a smooth road, especially when using different takes or two cameras for one shot.
By cutting on action, you create a seamless transition between different angles, preserving the flow of the scene and keeping viewers hooked as they watch an action that starts in one shot and ends in the next from a fresh angle.
You also enhance the visual flow and keep viewers engaged as they get to see an action that started in one shot being completed in the next one from another angle.
Imagine an action movie scene where a character is about to throw a punch. You start with a wide shot and then — swoosh — cut to a close-up right as they throw the punch, not after it has landed. This trick ensures a smooth transition, cleverly hiding any continuity blips while keeping the viewer engrossed in the movement.
You can look at some more examples in this video tutorial from Bamo Films.
Cutting on action adds visual coherence to the footage so the audience has a seamless viewing experience.
You know what else can make them more engaged with the video content?
Perfectly adjusted video colors!
7. Pay attention to color grading and color correction
Adjusting the colors in your video editing process is like tuning the instruments in an orchestra. It helps you orchestrate a harmonious visual performance for your viewers, amplifies the impact of your footage, evokes a symphony of emotions, and corrects any inconsistencies in color.
So how do you ensure all your instruments (colors) are in tune? There are two main methods – via color grading or color correction. It’s like choosing between the violin and the cello – both contribute to the melody differently.
Color correction is your first violin – it polishes your scenes to look clean and real or tweaks a color to sync perfectly with the rest of your visual orchestra. You’ll often find it leading the ensemble in documentaries.
On the other hand, color grading is your soulful cello – it alters your image to establish a different tone or atmosphere, creating a distinct timbre in your visual symphony.
So, how do you know when to call on the violin (color correction) or the cello (color grading)?
Consider the composition you’re trying to create with your video project. That’s a great starting point for deciding if you need color correction. But also keep an ear out for footage shot under challenging lighting conditions, inconsistencies in your footage, or if there’s a particular mood you’re trying to evoke.
Here are some tips to keep in mind:
- Familiarize yourself with the visual style of the project and the kind of mood you’re aiming for so it can guide your decisions.
- Use consistent colors throughout the video, especially in scenes with different lighting conditions.
- Get a reference image or color scope to help with the adjustments.
- Start with adjusting white balance, contrast, and exposure.
Conversely, color grading is usually used in narrative films, music videos, or commercials. So, if you aim to stir your audience’s emotions and craft an enticing visual ambiance, color grading could be your go-to adjustment technique.
Before you begin…
- Get a good grasp of your project’s visual and mood expectations. Knowing the atmosphere you want to create will guide your color choices.
- Dive into color theory. Understanding what emotions different colors can evoke will help you hit the right emotional notes in your video.
- Don’t forget about skin tones. Adjust these, so they’re pleasing to the eye and look natural.
- Play around with color wheels and curves. These tools can work wonders in enhancing your visuals. Go on, give them a spin, and see what magic you can create!
Speaking of experimenting with things, you might want to try different transitions and effects to make the final cut more immersive.
8. Experiment with transitions and effects
Imagine transitions as your movie’s very own tour guides. They’re the friendly folks helping your viewers navigate the winding roads of your film, making sure they understand the route, what’s happening along the way, and why.
To give your viewers a full-blown cinematic road trip, you’ve got to mix and match different types of transitions.
These are your secret weapons to express the ticking clock of time, evolving storylines, quiet moments, and character movements in a way that truly clicks with your audience.
Here are several transitions you can experiment with:
1. Dissolve: Picture this transition as a gentle fading of one scene into another. It’s often used to signal the passage of time, narrate a continuous storyline, or usher the audience into a fresh scene.
There are two main types of dissolve transitions. First, there’s the cross dissolve, which masterfully blends one shot into the next. Then, there’s the ripple dissolve, creating a mesmerizing rippling effect between scenes.
Consider using dissolves when you want to:
- Seamlessly shift between different time frames, like journeying from past to present.
- Foster an emotional link between scenes.
- Indicate a location change.
- Reflect a character’s reminiscence.
2. Wipes: Picture these as quick scene-changers, typically sweeping in from the side frame to replace one scene with another.
There are three main types of wipe transitions. First, there’s the iris wipe which employs shrinking or expanding circles to transition between scenes.
Then, we have the shape wipe, which swaps out circles for other shapes like stars, matrices, hearts, or clocks. Lastly, there’s the invisible wipe, which cleverly follows a character, tracking in parallel with the camera.
Consider deploying wipe transitions when you’re aiming to::
- Create a vintage or retro atmosphere.
- Indicate a change in location or timeline.
3. Cuts: These are your go-to for direct transitions between scenes or shots, and they come in a variety of styles:
- Hard cuts: These are your straightforward transitions, leaping directly from one shot to another without inserting additional clips.
- Jump cuts: These are the unexpected leaps that disrupt the viewer’s visual continuity, adding an element of surprise.
- L-cut: In this style, the audio from the first clip continues over the visuals of the second clip, creating a smooth auditory transition.
- J-cut: This is the reverse of the L-cut, where the audio from the second clip sneaks into the first clip’s visuals.
- Match cut: This transition links two scenes with similar shapes, movements, or sounds, creating a visual connection that the viewer can follow.
- Cutaway shot: The footage temporarily veers away from the main subject to a B-roll cut shot, providing a brief visual detour.
9. Make tight cuts and edit out mistakes
Imagine you’re sculpting a masterpiece out of marble. Creating high-quality videos is a lot like that. During the editing process, you’ve got to chip away at the irrelevant footage, awkward pauses, and those pesky filler words to reveal the beautiful piece underneath.
Doing this doesn’t just make your video look shiny and professional – it shows off your keen eye for detail. Plus, cutting out the errors helps you:
- Slide your story or message smoothly across to your audience, as slick as a cinema snack bar hot dog.
- Keep your viewers’ eyes glued to the screen, soaking up every second of your video.
- Make sure the quality of your video is as comforting and satisfying as sinking into a plush cinema seat.
Ready to chisel away those mistakes? Here are some tips:
- Scrap any takes, scenes, or footage that isn’t adding value to your message or story.
- Make sure there’s a smooth transition between scenes – you want to maintain a continuous flow throughout your video, as seamless as a river.
- Pop in some cutaway shots to distract viewers from any potential mistakes or glitches.
- Stick to consistent visuals and framing for a cohesive look throughout your video.
- Trim out any unnecessary chit-chat. Focus on the moments that add to the storyline and keep viewers hooked.
- Use audio editing techniques, like splicing, to iron out any hiccups in the sound.
10. Choose the right music
Music and sound effects are powerful tools in video editing that improve the overall impact of the storyline by adding depth and evoking emotions.
Like a conductor in an orchestra, music can
- Guide the audience through different emotions.
- Amplify tension.
- Set the rhythm and mood of the video.
- Create an immersive experience for viewers.
- Add realism to the video’s motions and actions.
When used correctly, music can also cover up unwanted dialogue or background noise.
Now, how do you know which music is right for the video?
- Know your audience and what they like. It’s all about finding the right rhythm that resonates with them.
- Plan for music pre-production. Essentially, you want to understand the message of your video before production starts and then figure out how to amplify that message through your music.
- Set a budget. Whether hiring a composer to craft custom tracks or selecting pre-made tracks, remember that music comes with a price tag.
- Use the music as a bookend. In other words, can three to five seconds of it be used to capture people’s attention? If so, using this as an intro can help viewers focus. It can provide a satisfying sense of closure if used as an outro.
- Consider the lyrics too. They should enhance your video’s storytelling, not distract from it. The best lyrics capture the scene without overshadowing the message.
- Make sure the pace of the music is in sync with the video. It should fade in and out at just the right moments, like a well-choreographed dance.
- Opt for royalty-free music to avoid legal hiccups after sharing your video. You don’t want any surprises down the line!
11. Take a break from the project
Ever feel like you blink, and suddenly your whole day’s gone? One minute it’s 9 a.m., and you’re just firing up your editing software, and the next, it’s 9 p.m., and you’re still going strong.
Being immersed in work this way can lead to burnout and stress. But by taking time away from the project to rest, you’ll get to:
- Recharge those physical and mental batteries.
- Enhance productivity and efficiency.
- Improve moods and reduce stress.
- Gain fresh insights, perspectives and approach editing from a new angle.
- Keep your creativity flowing in the long run.
Sure, we all know that taking a break is good for us. But how many of us know what to do when we hit pause?
If you’re stumped, here are a few tips::
- Engage in physical activities like running, taking a walk, or stretching. Basically, anything that gets the blood pumping and flowing.
- Dedicate some time to meditation. Take deep breaths and focus on them, then observe your thoughts and try to clear them.
- Tap into your creativity outside of work. Paint, write, make music — whatever floats your boat.
- Socialize and talk with people *outside* of social media or on screens.
When you do get back to work, chances are you’ll have a clearer idea of what your next steps should be.
Keep in mind, however, that there might not be any ‘next steps’ if you don’t back up your files.
12. Back up your files
Just picture it: all your hard work, all those hours, gone instantly. It makes you want to pull your hair out, right?
Even though most video editing apps back up projects at intervals, it’s still not enough as the backup is made to the same drive as the actual project.
So if anything happens, both the project and backup will be gone.
What can you do?
Well, it’s time to get creative with your backup strategies. Think about using cloud storage or saving everything on an external hard drive.
You could even try a redundant file system where you scatter your files across different locations. It’s like hiding your Easter eggs in various places — if you lose one, you still have the others!
***
They say all good things must come to an end, so we hope you’ve learned a lot in our ‘shot’ time together. 😅
It’s now time for you to enhance your editing workflow.
Enhance your video editing workflow
How do you know listeners enjoyed a symphony? They give the orchestra a standing ovation.
Similarly, you know your video editing project is done when the client approves the project.
To get the client’s approval, professional editors use MarkUp.io to easily request feedback and approval.
Sign up for a 30-day free trial on MarkUp.io and get applause for a job well done.